Propagation System 1
 This system creates an enclosure that maintains a humid environment ideal for propagating cuttings.
Method of construction
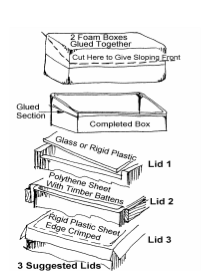
- Cut the undulating tops off two large foam boxes to achieve straightness to the sides.
- Glue one box onto the other, forming a box without openings.
- Cut the box on an angle as shown. The angled top allows condensation to run off and accommodates cuttings of different lengths. This gives a height of approximately 390 mm at the rear and a height of 230 mm at the front.
- Make a tight fitting cover for the slanting top of either:
- glass or rigid plastic (lid 1),
- polythene sheet stapled to a frame (lid 2) or
- laminated plastic with a crimped edge (lid 3).
The completed foam box is kept permanently in semi-shade with minimal morning sun to prevent drying out of cuttings.
Propagation System 2
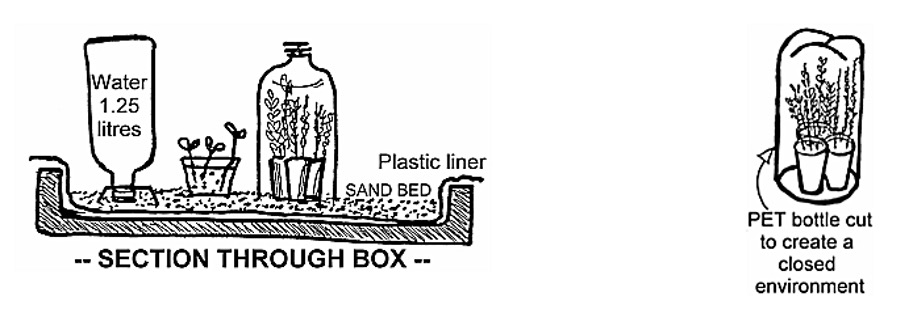
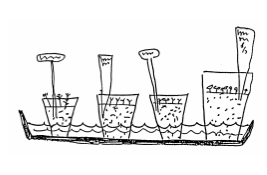
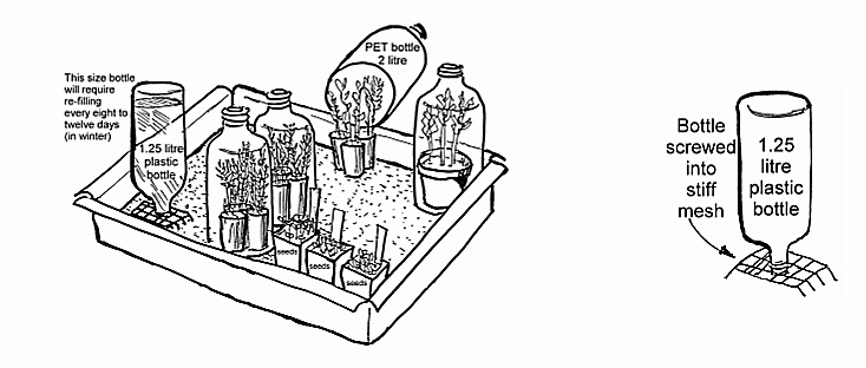 This system creates a capillary bed as shown below, constructed from foam boxes lined with plastic sheet to make the box waterproof. Such boxes are available in fish, fruit and vegetable stores. (Note: broccoli and prawn boxes being waterproof do not need a liner). The bottom is covered with sand to a depth of 10 mm. The sand is kept moist by supporting an inverted 1.25 litre bottle of water as shown, screwed into a stiff mesh that is bent to a U-shape. The bottle will require refilling every 8-12 days in winter, more in summer. The box shown will hold 11 PET bottles and 33, in number 50 x 75 mm tubes.
Propagation by Cuttings
My propagation mix is river sand or propagation sand from a nursery washed in a bucket to remove the silt. I also add coco peat up to 25% of mix, and decide the amount according to the coarseness of the medium, i.e. less if fine sand.
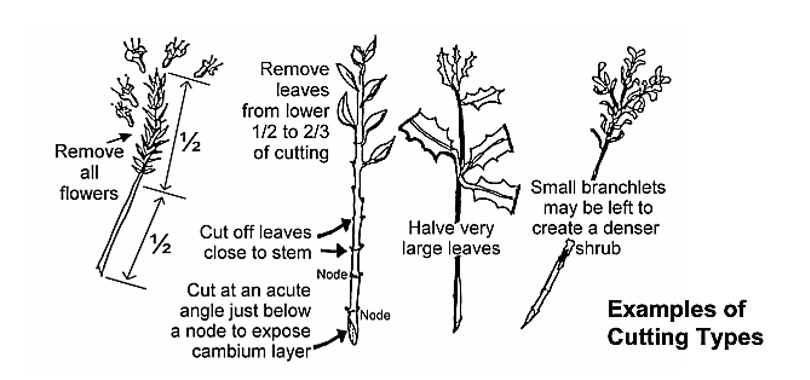
Cuttings may be collected at any time of the year. Each cutting averages between 80 mm and 250 mm selected from growing tips or side shoots and leaves are left up to half the length of the cutting. Select wood up to a year old, but before it has become woody. As a general rule, softer stemmed material = shorter and harder = longer. The method is shown in the sketches below.
If you are not going to plant the cuttings straight away, then it is important to keep cutting material fresh. Place the material in a plastic bag, sprinkle water into the bag, swirl it about and upend to remove surplus. After closing the bag, store in a cool place or refrigerator for up to five days. Alternatively, the cutting material may be wrapped lightly in damp newspaper inside a bag or container for three or four days. In this form they may be posted. Cutting material can be put in a jar of water to restore moisture for a few hours or overnight.
When cuttings have been prepared, it is desirable, although not essential, to dip the end in a rooting hormone, a gel, powder or liquid, according to the manufacturers’ directions. Such products include Clonex Gel, Yellow “Induce” or Yates Hormone Powder. Many propagators are now using Clonex Gel but I have not found it better than my old method using a cutting powder.
A PET bottle is placed over three tubes. 11 bottles with 33 tubes fit within the box. I get best results with PET bottles with the base cut out and the cap discarded but occasionally the reverse is used creating a closed environment as shown.
Place the box in a glasshouse, bush house, igloo, cold frame or a morning sun position on a veranda. Without heat or misting the system is maintained over the whole year and apart from the rooting time slowing up in June, July and August, no ill effects from temperatures down to 9°C have been noticed. Under these conditions I have propagated a wide range of plants including many Epacrids.
Some Pointers for Striking Cuttings
Patience is required as native plant cuttings of soft wood may take four to eight weeks, but some hardwood cuttings may take between 12 weeks and at least a year, to root.
Be warned – a few species are so difficult that raising from seed is to be preferred. Flannel flowers, Eucalypts, Banksias and Hakeas are examples.
A short cut: some Scaevola, daisies and soft stemmed species strike more readily in a jar of water than in a propagation mix.
The five diagrams below show the process from preparing the propagation mix to potting on the struck cutting.
Advantages of Cuttings
There are many advantages to growing plants from cuttings. These include:
- Plants are true to the parent in all respects.
- Plants flower sooner in most cases than seed grown plants.
- Species difficult to grow from seed are often easily grown from cuttings.
- Seed is often unobtainable due to insect destruction, as in many pea flowers, or out of reach on a tree.
- As opposed to seed, cuttings may be collected at any time of year.
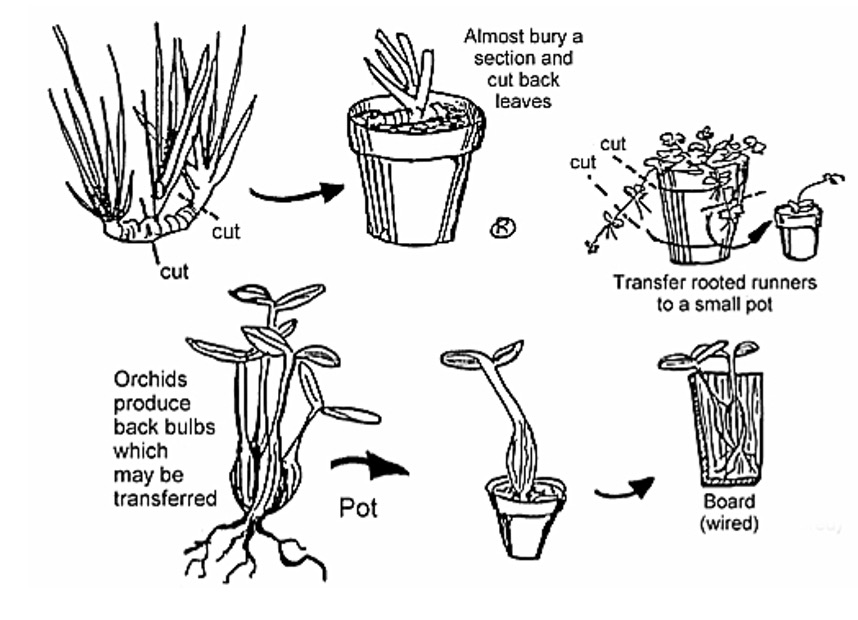
Propagation by Division
Plants that produce runners, offsets, suckers, stolons or rhizomes may be reproduced by division i.e. Kangaroo Paws, Patersonia, Native Violets, Dianella, grasses, Lomandra and some orchids.
Propagation from Seed – the Bog Method
This method is especially suited for plants of Myrtaceae such as: Eucalyptus, Callistemon, Melaleuca, Kunzea, Tea-trees, myrtles etc.
Pots with seeds for germination are stood in a tray where the water level is maintained at eight mm deep.
Take seedlings out of water at 10-12mm high, then water from the top to avoid damping off.
Pot the seedlings on into individual pots when their first true leaves emerge and then resume normal watering.
See an illustrated PDF of this post here: Propagation of native plants