Advantages of this method over traditional method of grafting onto rooted stock plants:
• The time and effort growing stock seedlings is unnecessary, allowing for cheap and easy experimentation which is likely to encourage greater participation in grafting.
• Growers can choose a rootstock from their own garden, from a plant which is proven to be vigorous and hardy in their conditions.
• Given practice, cutting grafts are easier and quicker than the traditional method.
Steps for successful cutting grafts:
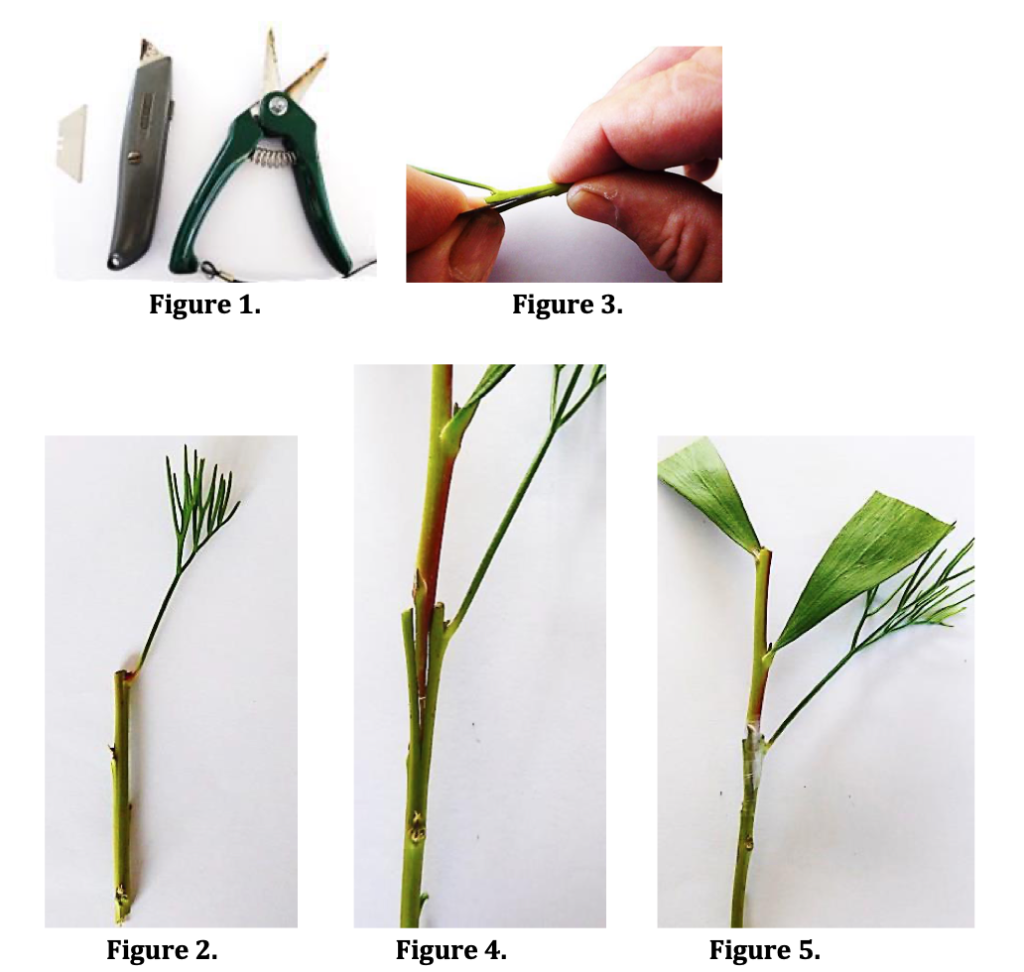
1. Assemble tools: Stanley knife, Stanley knife blade, secauteers (Figure 1).
2. Scion (species being grafted): Take a cutting of your chosen scion. Select firm, semi-hard scion material and trim to around 5-8 cm in length. New tip growth should be avoided as this will tend to wilt quickly resulting in the graft failing.
3. Stock: Take a cutting of your chosen stock. This cutting should be chosen to match the diameter of the scion material and should be around 8-10 cm in length. Remove all leaves from the stock cutting apart from one leaf at the very tip of the cutting (Figure 2). All other leaves can be removed – be careful not to strip the bark when removing leaves. Keeping the top leaf is vital to prevent any ‘dieback’ around the graft union.
4. Use the blade of a Stanley knife to make a 1 cm slit down the middle of the stock cutting (Figure 3). NOTE: correct technique is vital to avoid cutting yourself – hold the blade in your left hand and the stock cutting in your right hand, then move the cutting to the blade, wiggle the cutting slowly onto the blade until the 1 cm cut through the middle of the cutting has been completed. The left hand holding the blade does not move. You will only cut yourself if you push the blade into the cutting and it slips!
5. Use a Stanley knife (only the blade is used to make the slit, whereas this step uses the knife itself) to cut a wedge in the bottom of the scion stem of around 1 cm so that this can be inserted into the stock cutting.
6. Insert the wedge-cut scion into the cut at the top of the stock cutting (Figure 4). Then tape the graft union using Parafilm (the piece of tape should be about 5 cm long and 1 cm wide – cut tape into pieces of this size) so that the graft union is totally covered and is waterproof (Figure 5). The tape should be stretched as it is wrapped so that the taping is tight and the tape adheres to itself.
7. Treat the resulting cutting graft as you do a cutting, i.e. nick the bottom of the stock, insert into Clonex Purple Gel for 5 seconds then place into cutting mix.
8. Roots should appear on the stock within 2 months in the warmer months (may take longer in the cooler months).
9. Once the cutting graft is potted up the graft should have taken and the plant can be grown as for a normal cutting.
Choose the right species as your stock
Stock plant species used in cutting grafts must satisfy three criteria:
• The species must be tough and long-lived in your garden conditions
• Cuttings from this species must strike roots readily and consistently
• The species must be compatible with the species being grafted onto this stock species
Recommended stock species
• Isopogon – ‘Coaldale Cracker’, anethifolius, anemonifolius
• Eremophila – Myoporum species
• Prostanthera – lanceolata, phylicifolia, linearis
• Hakea – salicifolia
• Grevillea – ‘Carrington Cross’
• Banksia – integrifolia (difficult!!) – don’t use hormone on Banksia cuttings
This is a handout from a grafting demonstration given at the Kiama Conference by Phil and Catriona. They have previously visited Armidale and run a workshop for us – newer members may find the technique valuable.
This article is taken from the Armidale group Summer Newsletter 2023. John Nevin – Editor of Armidale APS Newsletter.