Creating your own propagation box
(Words and photos by Jan Douglas)
During the Harbour Georges River March 2022 meeting, there was some discussion of mini greenhouses and other ways to look after cuttings and seedlings. I tried to describe the cutting frame I use for propagation of plants by cuttings. It’s based on a mini-hothouse constructed by Sophie Thompson on the Gardening Australia television program. Here’s the link: https://www.abc.net.au/gardening/factsheets/a-simple-hothouse/9435828
The cutting frame is a modified plastic storage box. Four holes are drilled in the lid for ventilation, and one hole is drilled in the side of the box, about 3cm above the base. A layer of coarse river sand is placed inside.
Want to give it a try?
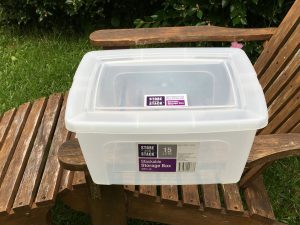
1. Find your box! It needs to be tall enough for your cuttings in their pots not to touch the lid. I think a good height is at least 27cm. (The box in these illustrations is not as tall as I like.) The storage container should be clear plastic, to let in the light. It
should be reasonably sturdy, but not too big, as it gets quite heavy once set up. Discount stores like The Reject Shop and Silly Willys have these boxes – you can also find them at hardware stores and some supermarkets.

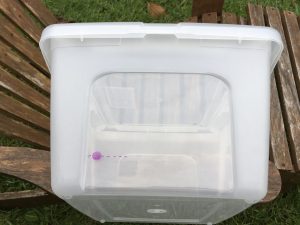
2. Use a marker pen to mark four holes in the lid and one in the side of the box, as illustrated. The hole in the side of the box (the drainage hole) should be about 3cm above the base. Choose a drill to give you holes of about 8mm diameter. To avoid cracking the plastic, put a piece of waste timber under the plastic while you drill slowly.

3. Put a fairly even 3cm layer of coarse river sand in the box and water the sand so that it is saturated, but there is no free water. (Tip out any excess through the drainage hole.) The top of the sand should be just above the bottom of the hole in the side of the box. That stops the box from filling up with water, but keeps the sand damp – as long as you water the box occasionally. Sophie included a watering system in her mini greenhouse. I tried this for a while, but found it wasn’t necessary – and it takes up room that could be occupied by cuttings!
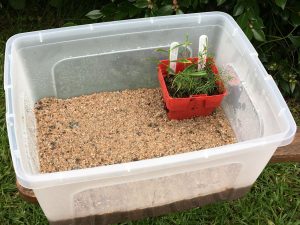
4. Put your pots of cuttings in the cutting frame, making sure that the bases of the pots are embedded in the sand. Spray the cuttings with water, put the lid on the box, and put the box somewhere that is very well lit, but not in direct sunlight – you don’t want to cook your cuttings!
A few other points:
• If you are moving your cutting frame, be sure to carry it from underneath, not by the edges of the box. The load of wet sand and plants may be enough to break the box otherwise.
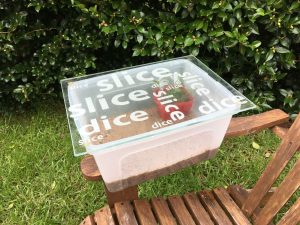
• Even better than the lid of the storage container is a glass sheet (as long as it doesn’t have sharp corners or edges). I use a second-hand glass cutting board from an op shop. My cutting board has little feet that give a narrow space between the glass and the top of the box. You could add little bump stops or similar spacers. I have a few theories about why the glass lid gives better results than the plastic lid, but no definite answers.
• Most of the water for the cuttings is provided by the water in the sand, but I do also
spray the cuttings occasionally. In mild weather I have been able to leave the
cuttings unattended for more than two weeks.
• In my experience, this system is very good for propagation of cuttings, but not for
propagation of seed. It may work better for seed if the lid is left off.
Growing Things in Your Kit – Graham Fry
Question: What is the difference between greenhouses and propagation boxes?
Answer: Greenhouses are basically structures with walls of fine mesh to protect plants from direct sunlight and heavy rain and possibly provide more humid atmosphere. Propagation boxes have much more controlled conditions, with no direct sunlight and a stable and warm atmosphere. Some boxes have bottom heating as well. Generally, you don’t need to water cuttings very much, other than not letting the soil get too dry. In fact, some people recommend not wetting the cuttings at all as the most common problem is rotting of cuttings. I suggest that you allow the cutting box to dry out a little by leaving the lid off for a day or so. It is always tricky getting some heat into the box but not too much and that’s why professionals use underfloor heating that can be accurately regulated.
The two most common methods of plant propagation are growing on from seeds or from cuttings. Both methods are suitable for native plants although generally some families respond better to one technique or the other. Note that it is illegal to collect seed from plants in national parks and reserves without a permit. Therefore, seed can only normally be collected from plants in gardens or seed can be purchased from licensed collectors. You can also get seeds for the cost of a stamp, from our sister organisation in Victoria. See here for more information.
Growing from Seed
The growing medium is important and there are many recipes. Basically, a mixture should be free draining but still retain some moisture. Propagation mixes can be purchased in nurseries but the common ingredients are washed sand, vermiculite and peat moss. Some seed requires pre treatment to mimic conditions in the wild such as placing acacia seeds in hot water for 24 hours before planting out. Many require soaking with smoke water to simulate the conditions post fire and others might need to be placed in a fridge for a few weeks.
Fill a small pot with your propagation mixture and gently tap down to remove any obvious air bubbles. Gently water and then place the seed on the surface if small or larger seeds should be buried to about the same depth as the size of the seed. Keep pot moist but don’t over water. Some people put the seed pot into another container with some water so that the propagation pot sits in about 1cm of water. The seed should be kept in a warm but not hot area, sometimes window sills are successful but perhaps not in summer.
Monitor the pot and once the seedlings are about 1-2 cm high soak the pot in water and gently remove the seedlings and repot into tube stock or similar filled with standard native potting mix.
You will probably have more failures than success and you might need to refine your methods but is can be very rewarding. This method is good for growing large numbers of plants.
Growing from Cuttings
Growing from cuttings is easier as you can acquire cutting material relatively easily. A similar potting mix to the seed mix is OK but you need to watch the moisture levels as excessive watering or high humidity will cause the cuttings to rot. Cuttings need to be about 8-10cm long and should have a diameter of around 2-3mm. Remove all the flowers and most of the leaves but leave a couple. There are a number of rooting hormone materials available which seem to improve the success rate.
Once ready to go, prepare the cuttings, cut a small chamfer off the bottom of the cutting and place in water. Then dip the cutting into the hormone powder or liquid and place in a preformed hole in the propagation pot. Gently, press the soil down around the cuttings and water. Cuttings should be left in a glass house like area where they get plenty of light but not direct sunlight and are sheltered from wind. A simple glass house is a plastic soft drink bottle that is cut almost in half but still joined so that the top is connected to the base by a hinge. A couple of small holes should also be made in the base. Fill the base with potting mix and gently water before adding the cuttings. Once the cuttings are in the bottle, close the bottle and attach to the base with a piece of sticky material such as masking tape. Leave the lid on. Monitor the setup regularly and water at maybe 2 to 3 day intervals.
Once the cuttings strike, you will probably see roots in the base of the bottle or the cutting is growing new leaves. Gently remove the cuttings and repot similarly to the seed growing method.
Some native families are very easy and novices should practice on these initially. Easily propagated families are westringias, prostantheras and goodenias.
Sometimes these methods do not work for often unknown reasons. This summer I have had very low success raising plants from both seeds and cuttings and suspect the high humidity might have caused problems. I’ll keep on trying.
Best of luck.
Other Sources of Advice:
Gardening Australia https://www.youtube.com/watch?v=s63iGkn8dpY
https://www.austplants.com.au/Central-Coast-Resources scroll down about half way to find
Articles on propagating. This includes suggestions for plants that work well.
https://www.austplants.com.au/Sutherland-Resources A quick overview of propagating
Plants from seeds and cuttings by Ron Stevens, a former member of the Group.
http://anpsa.org.au/plant-propagation/ quite detailed advice on propagating from seeds
and cuttings. Select the relevant link.